SECOND PART, of FOUR:
The February 2 start polishing abrasive 320
medium grain size 30 microns.
The reference text indicated in the first part to the point (2) Realize your telescope di e Karine Jean-Marc Lecleire; to their page 152 says that the grain 240 (…abrasive corundum) need 3 hours and 15 Work to clear the previous tracks on a Ø250 mm mirror. If it is so, with carborundum which is more aggressive than corundum, I should get me in less time: We'll see.
Spolvero the abrasive (thet comes less easily than the previous 180 but must be solicited by tapping the container).
Sploverare the abrasive with the plastic container corked (in addition to the external screw cap) a capsule in which I drilled some holes, it is very convenient to adjust the amount. One should not put too abrasive because it would only for kneading the movement favoring dangerous seizures mirror-tool, and would also too abrasive for shredding itself, instead of efficiently attack the glass.
wet with 28-30 water drops .
my wet last about 3 minutes (one more minute of 180).
As writes the book (2) I therefore expect 65 wets (that is 3,5 time allocation, or 195 minutes, divided by the duration of 3 minutes for each wet).
The strokes are always alternate “mirror above - utensil above”. The amplitude is always 1/3 diameter forward and backward, ZERO left and right (but in fact we move inadvertently approximately 1 – 1.5 cm per side, which they are exactly as they require reference texts).
The force to be used for moving the object in the hand is slightly more "mellow" of what was needed for previous grains, but the object on the table stands still on the anti-slip mat without any other expedients.
Since the rule of the work is expected to change grit size when abrasion have deleted ALL craters size equal to “"grit"” abrasive: Every 20 wet I control the surface by microscope.
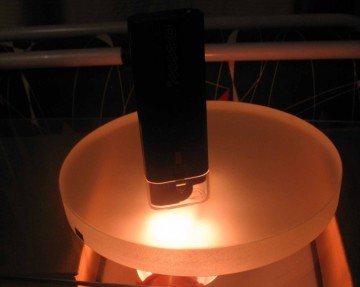
Controlling with microscope and light back and side, the trend of the disappearance of the craters left from previous coarser abasive.
even the arrow Control ... a little reaching its increased 3,16 mm: ... And with this value vanishes completely my fear of unequal working efficiency, for weight difference between the tool and mirror ... ..even because the continued operation of the work, The finer grits I'm going to use will produce less obvious effects exponentially.
Even the bevel is reduced to half a millimeter, and then still remain 2 good mm.
FOR PURE PREVENTION, Despite the good margin, I widens slightly this chamfer with three laps of table of whetstone on both the edges of the tool and mirror.
NOTE: The chamfer is absolutely essential because it greatly reduces the risk of chipping of the reflective edge of the mirror or that of the tool.
But when you do this remaking operation of a consumed chamfer, It is high the danger of stimulate detachment of splinters in subsequent processing, or to arrange some of these like peninsulas “deaf” (meaning that is attached only to a pedicle) but of coarse dimensions, that come off much later, almost always streaking the mirror so aesthetically irrecoverable, but of little account in the optical damage which in any case will be present.
Is’ then possible and advisable to avoid the problem by making an important chamfer at the beginning of the processing that follows the sbozzatura. Three Ø 300 mm for a mirror are a given target.
Such a chamfer very probably will last until the end of processing (its duration depends very much on the size of the mirror and the way we work), as they are initially used the coarse abrasives that consume the most, while the size of abrasive used towards the end of the ripening of the surface, it will attack much less, conducive toward zero with the 500 and up.
GOLDEN RULE: So it is much better to get in position to avoid redoing the bevel when you have already used fine abrasives.
Other rules that I have experienced and I suggest, for the remaking of the joint bevel with the whetstone are:
1) Obtain a whetstone not so coarse (it removes less, but potentially produces smaller chips) and an even finer to trim the gap with some stroke almost horizontal.
2) Preferably start with the reconstruction of the joint bevel with strokes of stone cote in diagonal 45 degrees and moderate pressure, but one way (It is in fact in the return upward that detach more easily for "lifting", splinters on the top edge of the bevel which adjoins the machined reflecting part Mirror.
3) Maintaining that the whetstone has the flat surface, because any depressions consumed would cause an unbalanced distribution of effort, facilitating chipping where the load is more concentrated.
4) Inspect with a good magnifying glass bevels just made. If they are detected small translucent halos, It would be faced with possible glass chipped peninsulas. In this case the solution that solves almost always, is to get the cyanoacrylate glue specific for glass, (which again is very liquid and penetrates well into narrow slits) to paste.
End of notes on the chamfer.
The refining of the surface made from the abrasive 320 It is immediately evident. Skip to the eye the formation of a much smoother surface that spreads like wildfire out of control, kicking and gradually eliminating the craters further still present.
This evident difference in roughness of the coarse craters from previous grains, and areas already honed by this finest grain, He emphasizes the goodness of the criterion (non-exhaustive), that governs the choice of the progression of the abrasive grits, centering on the halving (in each change) of the average diameter of the grains. In that way, the microscope control of the ripening progress becomes much easier, so it is easy to decide when to switch the next finer abrasive.
Bracket jocular ![]() Work is a little monotonous, and then listening to background music helps to distract ... ..even for not constantly in the ears of the abrasive noise ...... that in strokes back and forth with the abrasive-grained (incredible , but it is so) ...... does an onomatopoeic sound that whispers softly, and may be only to those who are of Italian or Spanish lenguage , that have the two syllables ...... .. "Se -sso Se -sso Se -sso" (...... But maybe it's my subconscious XY chromosome to make me these subliminal suggestions ;-).
Work is a little monotonous, and then listening to background music helps to distract ... ..even for not constantly in the ears of the abrasive noise ...... that in strokes back and forth with the abrasive-grained (incredible , but it is so) ...... does an onomatopoeic sound that whispers softly, and may be only to those who are of Italian or Spanish lenguage , that have the two syllables ...... .. "Se -sso Se -sso Se -sso" (...... But maybe it's my subconscious XY chromosome to make me these subliminal suggestions ;-).
Later, after 85 wets remains only some partial bottom of a little of craters, due to the previous jump here and there, of these named scales "deaf": I decide to go to the grain 500.
Total: 85 wets - grit 320 - Average grain size: 30 microns – Work time 3 hours – Abrasive used: 82g
Total time work = 6 hour
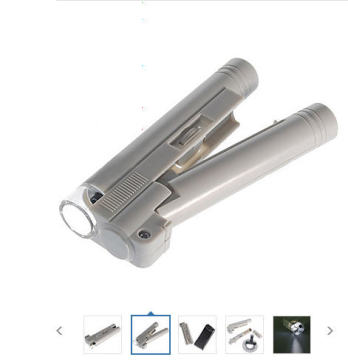
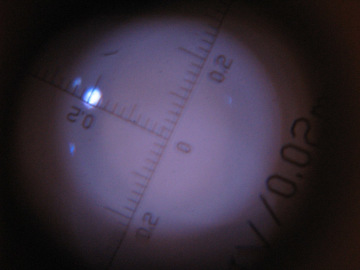
As my pocket "Russian" illuminated microscope having 30 magnifications, It has in the transparent lens socket, a lattice large one millimeter divided into ten divisions each large 100 microns, I note that now it is still easy to estimate the size of the craters left by grit 320 (which there are three in each division of my lattice), but I also think it will be not so easy with the next finest abrasive.
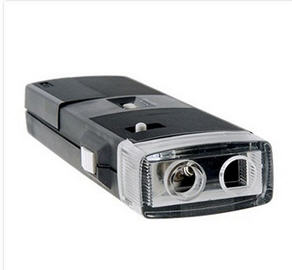
Illuminated 30X Microscope, with or without lattice 100 microns, (simply turning the socket transparent front of the lens).
Having found in the WEB another three times more powerful, for less than 20 euro, I proceeded to the purchase. IS’ Also this enlightened and provides 100 magnifications, and the eyepiece has a best lattice with step 2 hundredths of a millimeter, that is 20 micron. It will certainly be useful for very well to inspect the surface with fine abrasive polishing.
Footnote added 2016: I bought online a second microscope identical to this by 100x; but this came to me devoid of internal lattice 20 microns per division. Council then those who wanted to buy ask the seller before purchasing, that the model is one that contains such a lattice, which it is very useful to get an exact idea of the size of very small craters. End Note.
I clean the workplace with another "disinfestation" General and replacement of all the plastic covers, sponge etc .. as done previously, e …
THE THREE February PART THE GRINDING TO THE GRAIN 500
The strokes are always alternate “mirror above - utensil above”. The amplitude is always 1/3 diameter forward and backward, ZERO left and right (but as mentioned earlier, in fact we move inadvertently approximately 1 – 1.5 cm per side, which are desirable tolerance).
This abrasive grit 500 It is still a little more difficult than the previous sprinkle through the usual three holes on the cap of the container. ... And then patiently I dab the container ... but I think in other time I'll do some further small hole in the cap capsule.
Using as salt shacker the containers abrasives is too comfortable to leave it use in favor of other systems.
Because any other system would lead in fact to use more than one only object in contact with the abrasive (ie the container), and this increases the danger that a few grains of it remains in wait to fall on the already polished mirror and scratch it.
The force to be used for moving the object in the hand is much more "mellow" of what was needed for the grain previous. So much so that it becomes indispensable to mix the 25 drops of water with the abrasive dusted using a finger, so as to spread it uniformly over the entire work surface.
The mixing and coating makes the working fluid returns normally.
If you do not smear the abrasive wet a finger, one experiences a tool seizing and mirror to the simple contact with the piles of abrasive do not still wet, that prevents the start of strokes. Obviously the locking undermines the functionality of the non-slip mat that is on the table, and it would be good thing to screw on the table of the three classic stop to containment of the workpiece. But for the moment I think it's even easier to share the abrasive with your finger and do not put the three catches.
The work proceeds without history.
The arrow is 3.18mm (It is increased by 2 cents mm): Basically, it stops. And this is also confirmed by the measurement made with a "new" spherometer in the meantime I built.
at the wet No. 20, the view to the new microscope shows a homogeneous background with rare craters that are great division and a half of the lattice (3 cents mm), that is little more than the size of the abrasive grain 500.
I decides to make a few precautionary wers and then move to the grain 800.
Total: 28 wets - grit 500 - Average grain size: 20 microns – work time: 1 hour – Abrasive used: 25g
Total time work = 7 hour
Another general and accurate cleaning of the workplace, with replacement of all the plastic covers, sponge etc .. as done previously, e….
THE FOUR February DELIVERY WITH THE GRINDING TO GRAIN 800
The work strokes are always alternate mirror above - utensil above. The amplitude is 1/3 diameter forward and backward, ZERO left and right (but in fact we move inadvertently approximately 1 – 1.5 cm per side, which are the famous tolerance not to be exceeded to not countersink too early the sphere).
Same difficulties spreading of the abrasive and same technique elimination seizure start the wet. Resolved by coating with the use of a finger. The work is progressing smoothly.
However, given that the effort and the physical effort increases exponentially, and with them,inreases the difficulties of hold in place the piece at that moment is situated on the table. I put the three wood brackets centering of the mirror on the bench, by means of the usual three wooden lists screwed ... according to the classic method.
At the wet No. 20 the view under a microscope shows a homogeneous background with little craters, but with some "deaf" flakes now irrecoverable.
I decides to make a few precautionary wets and then move on to the preparation of the tool with pitch, for the polishing process. I leave then the mirror with a uniformly satin and perfect-looking surface
Total: Also here 28 wets - grit 800 - Average grain size: 13 microns – work time: 1 hour – Abrasive used: 29g
Total time work = 8 hour
Then follows a new general "disinfestation" of the workplace by the presence of grains of abrasive, with replacement of all the plastic covers, sponge etc .. as done previously.
The polishing and subsequent parabolizzation of the mirror are performed with the abrasive grain which has a size comparable to the micron or smaller. This abrasive is no longer simply interposed to the tool glass and mirror, but requires a transport carrier which is formed by squares of pitch, these squares encrusting in it the abrasive, increasing the efficiency of polishing process.
In facts the PITCH is not only the ideal vector for finests abrasives that are used (that are: Cerium oxide. the opaline, or refined cerium oxide, Zirconium oxide, or the iron oxide, or the iron oxalate).
Ma looking at very high magnification the surface of the mirror machined with pitch, you can notice that the tiny craters left on the mirrir from earlier abrasive, are not already with sharp edges (as those from even microscopic fractures produced when the abrasive is free to roll over the surfases and crush), but instead, You look they have rounded edges. And many of them have been partially or completely "filled of glass" to disappear.
The phenomenon that causes this huge benefit to a quality of transparency that can only be obtained with the glass and not with metals, It is the displacement of glass made fluid at the molecular level by the friction of the pitch, that has blocked itself the fine abrasive granules.
This filling process generated by friction, It starts normally after a continuous polishing activities 30 or 40 minutes, and is accompanied by an increase of the resistance at the work, with simultaneous formation of foam in the furrows between the squares of pitch tool, and also by the emission of characteristic odor“softwood” given off by the pitch.
ATTENTION BUT 'never to abandon for hours on the mirror, the tool garnished of wet abrasive. Because for a probable electrochemical phenomenon linked to the silicate glass that make contact, with the terpenes contained in the pitch and with the oxide of cerium, micropitting occurs that generates a micro roughness (which in French slang it is called "micro-memellonage") which, while it is of infinitesimal amplitude, It must then be eliminated, worth the loss of contrast images that will provide the mirror affected.
Then: After work you should always wash the mirror and separate tools and keeping them clean.
(Following the part 3)
