- This topic has 178 replies, 6 voices, and was last updated 4 years, 6 months ago by
Giulio TiberinI .
-
AuthorPosts
-
15 April 2020 at 19:29 #11708
After a few work sessions I would like to share with you some sensations found in polishing, I do it because I have the doubt that my actions are not entirely correct.
I start by saying that the mirror already has a very shiny surface even if they are still at the beginning of the work, I have many lines left to erase while the craters are gradually reducing.
I try to help me by referring to Giulio's constructive report.
Before starting the work session, I always heat both the tool and the glass to about 40 ° and use hot water for the oxide, then I perform a check to see if the pieces touch all using a cellophane sheet between the mirror and the utensil.
During the work sessions I happen to feel a very strong friction when I add the polishing powder, even if this takes a very short time just the time to perform 1-2 minutes of running, then afterwards the tool slides freely without friction even though the plugs all fit together on the surface, and it is at that point that I stop, I remove the tool and add more oxide.
Another thing I have found is for example the fact that my work sessions are not all the same, I happen to have a typical first session in the morning with the tool working in full friction, if then I detach for 1-2 hours and resume a new session(obviously by heating everything and retrying adherence) the tool no longer works in the same way, it lacks friction so much that I find myself with a tool that slides on the glass simply by sliding.
I also noticed that some pieces on the patina have lines like the lines left by the tip of a pin.
I managed to complete 4 sessions done well (of about 1 now each, 2 with tool above e 2 with tool underneath) where I felt the friction perfectly, the other three, as I explained, I made them but I don't think they helped much.
I also performed a Ronchi test since now the surface allows me to do so and the only hitch I see is a bit of a beaten edge which, however, I will leave it alone for now, since I still have a lot to polish it will most likely correct itself along the way, in the meantime, to remedy the problem, I am trying to perform short runs and I try to be careful not to overdo the pressure on the edges.See you soon

Luca
17 April 2020 at 21:50 #11710hi Luca,
Difficult to say for sure what the problem is.
From what you say it seems a problem of pitch adaptation or of the fact that you cannot always keep the adaptation constant between the various sessions.
I can tell you that in my experience I have never heated the tool before processing, apart from when I wanted to adapt the pitch very well, but then I let it cool off before starting the work session (much later 10 min of work the friction due to rubbing, it warms up just enough the surface of the pitch to make it yield and perfect its adaptation, which must have been more than good at the beginning though).
Else, I have never used hot water for cerium. I don't want that when you add it, if this is not distributed immediately evenly, you can find yourself with mirror areas and peace warmer than others.
What I've always tried to do, is to maintain a stable situation as much as possible, also thermal, between the various parts (mirror, tool, cerio, water etc.) and to do this I left all the parts in the same room so that they all had the same temperature at the beginning of the session.
At the moment I can't suggest you anything else.
It could help if you can post some pictures of the tool and Ronchi.
Hello and see you soon
Mirco18 April 2020 at 0:48 #11711hello Mirco,
thanks for answering me, I am a bit groping in the dark since it is the first time that I approach polishing with the patina of pitch, as I have already written I am referring to Giulio's report to help me a little.
Initially I also thought that the adaptation was not the best but I was sure when I performed the first work session and I noticed that the pieces were all consumed at the same time.
However, a test at room temperature of everything I could also do it, just to see if anything changes.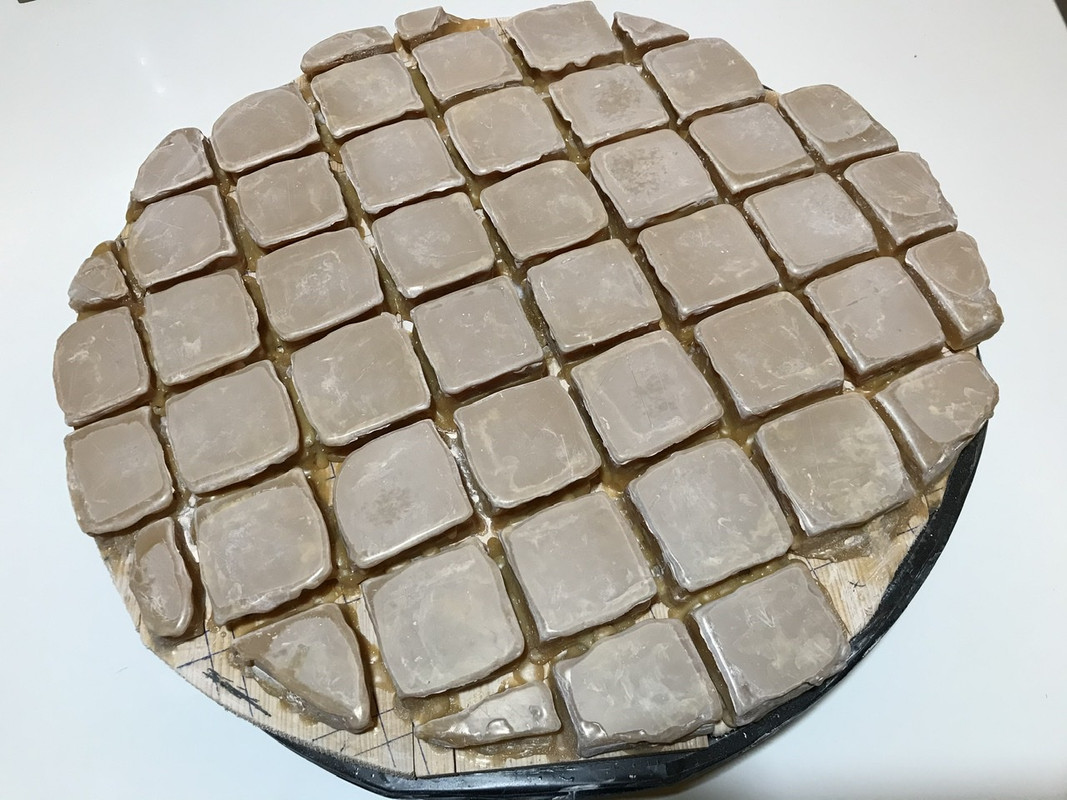
Another detail that I forgot to mention the other time concerns cerium, I don't know if it happened to you too but my dust contains impurities that tend to mark the glass during work, I have often heard them by passing my finger over them.
Now, before starting the work sessions, I always sift the oxide.
As for the Ronchi I'll be back to repeat it these days so let's see if everything is going well and then post some photos.See you soon.
 19 April 2020 at 14:19 #11712
hi Luca,
The tool looks well done, bravo the squares all seem equally affected by the processing. However, I confirm what was said in the previous post, I would try to work with all the components at the same temperature.
As for cerium oxide, no it is not normal for him to behave like this, yours probably got contaminated with some unwanted particles, you do very well to sift it before each process (I recommend the sieve must have a very fine mesh).
I have never had the need, but I know that some let the water / cerium mixture settle for a few hours, so that larger and heavier particles fall to the bottom of the container. I know somewhere in the forum or in the articles, Giulio had mentioned it, now I don't remember exactly where, I try to search. If I find the post, I'll bring you the link.
Hello and good scratches
Mirco19 April 2020 at 16:30 #11713hello Mirco,
I'll test all the elements at room temperature tomorrow even if at first I'll end up with some pieces that don't match, let's see if I get different results.
Unfortunately, I tried and tried the adaptation several times, making everything adhere well, detachment can only be seen when the tool returns to room temperature.
For the sieve I am using a mesh with more than 6000 jerseys, so much so that the oxide has a hard time passing but so I'm sure everything is clean, before I had the doubt that the problem came from the polluted pitch in fact I had to redo the tool sifting the pitch too to rule out the problem.
All that remains is to review a Ronchi again to be sure that everything is working well.
Update as soon as possible.Thank you, see you soon.

Luca
20 April 2020 at 0:44 #11718Ah other thing, what kind of pitch you are using and what temperature is in the room where you work?
Another possible explanation, also for the signs you find in the mirror, it may be too hard pitch.
Ciao
Mirco20 April 2020 at 12:29 #11720hello Mirco,
so the pitch I'm using is rosin mixed with a percentage of wax.
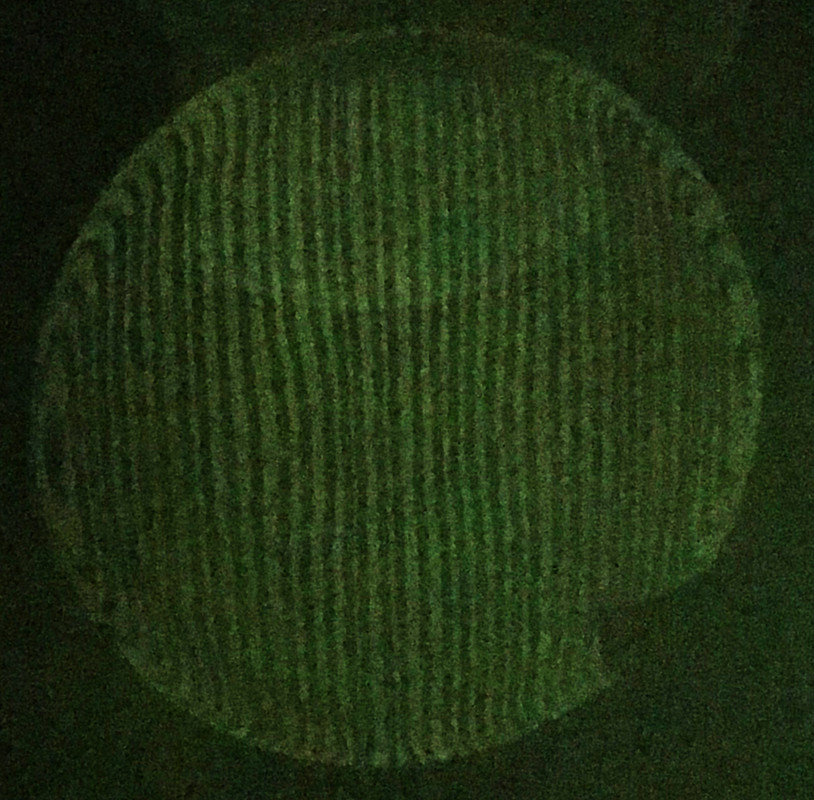
The temperature of the environment used fluctuates between 21 and 23 degrees.These first two images are in ExtraFocal
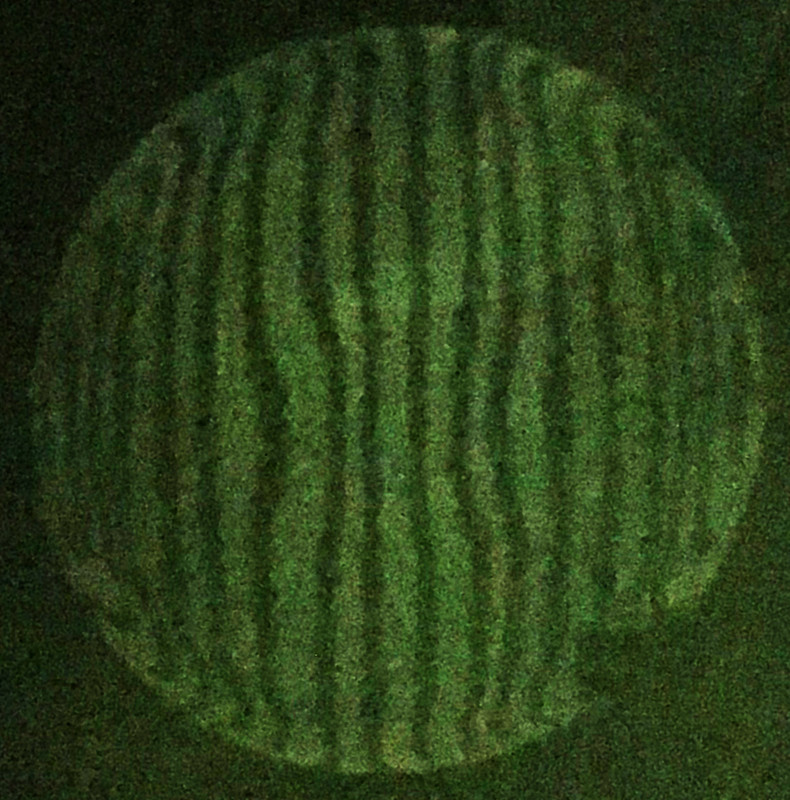
These instead in IntraFocale
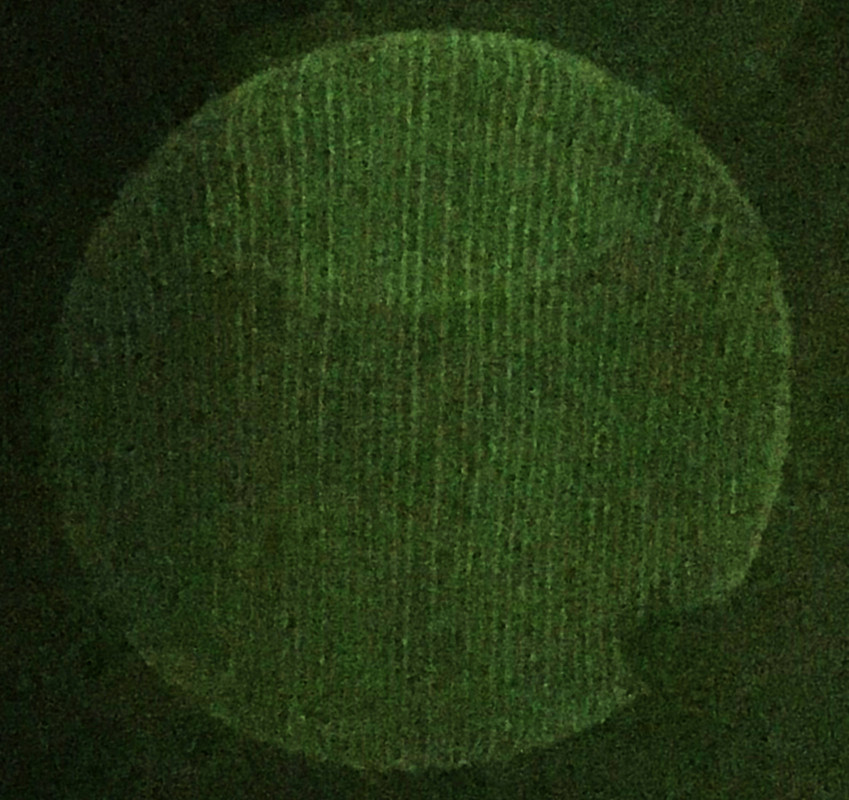
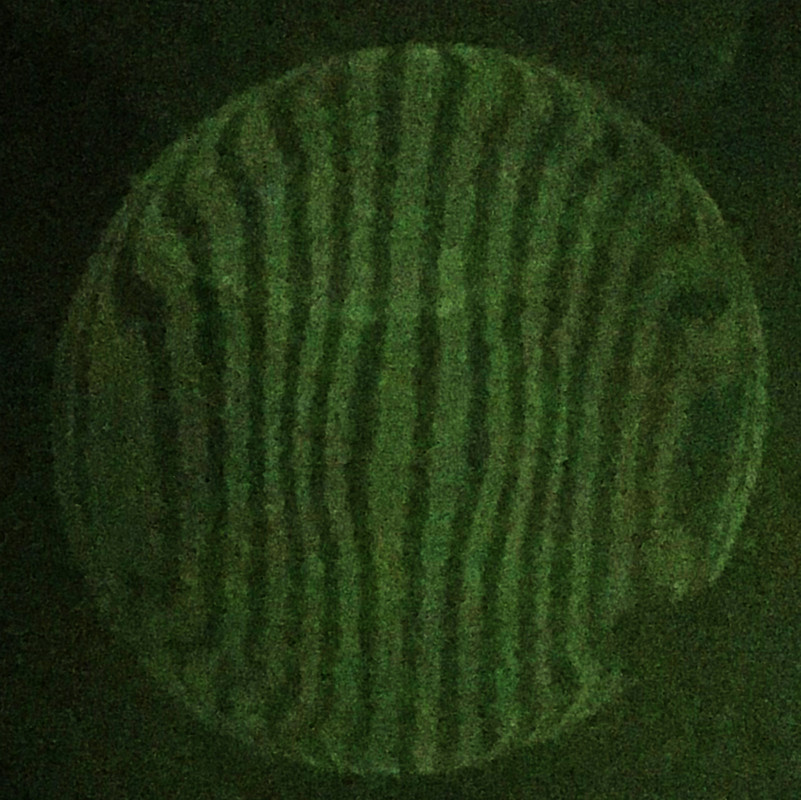
Referring to your post "Introduction to the Ronchi test" and looking at the images in intrafocal and extrafocal I find myself a hole in the center, plus the riveted edge(quite right??).
It was probably already like this or the tool is digging more in the center?
Also consider that the last three work sessions I performed with the tool above, according to the rule of the grattavetro I would have had to dig more at the edges
Any suggestions?

Luca
20 April 2020 at 22:46 #11722hi Luca, to be the first attempt at polishing is a nice result, you are on the right track, even if the figure is still far from the sphere.
I do not dwell on defects such as the central hole or the edge, which is not actually replied on the contrary, Ronchi indicates that the edge has a higher crown, which first increases the curvature ( from the center ) and then decreases it, like one “collina” right in the peripheral part up to the edge.
These defects are a consequence of an adaptation still to be improved, some areas of the patina work more than others and generate these anomalies.
The tool should be placed, you have to understand why it does not maintain or achieve uniform adaptation, otherwise you cannot think of correcting the defects by continuing to use the instrument that is the cause.
I have more than one doubt about the support of the wooden patina, I don't think he has the necessary rigidity. The patina must be able to yield, the support disk no.
Once the tool is set up and adapted, those flaws will simply disappear by working with short runs center by center. However good, my first Ronchi was far worse ! But now don't make the mistake I made in my first mirror, do not try to correct defects with manufacturing techniques because you do not get out of it until you understand and solve the tool problem. 21 April 2020 at 0:39 #11723
Hi Massimo,
Thanks but I don't feel like I've been that good given the time it took to achieve just enough results.

Since wood does not represent a good rigid support, I will have to look for something else, unfortunately, with aluminum I was initially able to find a balance of adaptation but in the end the blocks fell off and therefore I changed the support.
You usually do what you use to play it safe? Mirco had mentioned to me some marble supports.
In my case, I could get a very thick tile(2-3 cm) but I have to wait to get back to work.
I wonder if a good tool would correct even such a defect?
Sorry but from how I posted the photos you don't notice much but during the Ronchi test I made the lines were inclined by a few degrees on the whole dial.
See you soon
 23 April 2020 at 19:47 #11733
Here I am hello Luca

Oooo now that there are pictures of the ronchi you can understand a lot more things.
I fully agree with what Massimo said, both on the shape of the mirror (no riveted edge, but raised hillock, and hole in the central area), is on the inadequate stiffness of your wooden tool, and on how to proceed.
As for the support, in my experience, the absolute best I found to be a disc made with dental plaster. Otherwise, a glass disc of adequate thickness or a multilayer wooden disc from 25/30 mm thick though. Is’ true that I had also used a marble disc (I had it at home for free), it worked great, but it really weighed a lot and I was not at all well when it was time to work with the tool on it, so I wouldn't recommend it.You see the lines of the ronchi rotate from inclined on the right to inclined on the left, or viceversa, passing from intra to extra focal? Compared to the light source (crack or point) at what distance from it the returning light beam passes? it passes by or over the source?
Anyway good, I also agree with Massimo's compliments, even my first ronchi was soooo worse than this!
 23 April 2020 at 23:22 #11734
hello Mirco,
I don't want to say bullshit but it seems to me that the lines are slanted to the right in both extra and intrafocal.

To be clearer by looking at the posted drawing, they are like the image on the left.
To be sure I should repeat the Ronchi.
In the meantime, I'm building another tool, I poured some tile glue on the glass and let's see if the tool does its duty this time, then if the surface allows me I intend to stick on the squares in pitch .
.See you soon
 24 April 2020 at 11:06 #11736
hi Luca,
I'm not sure I understand how you are going to make the new tool. If you poured tile glue over the mirror to trace the curvature, OK, the important thing is that you make it of an adequate thickness, 25/30 mm in my opinion. I've never used tile glue, then I recommend you have to let us know if it works well or not
As for the ronchi, if the lines always remain inclined by the same amount and on the same side, passing from intra to extra, It's not a problem. It is probably due to the fact that you have not placed the grid perfectly vertical, so check both this and the alignment between the beam of light and the lines of the reticle.
The thing changes instead if you see them rotate, or change inclination from intra to extra.
Ciao
See you soon
Mirco 24 April 2020 at 11:50 #11738
hello Mirco,
Yes, I poured the glue directly onto the glass, now I'm waiting for the drying given the thickness I gave it (3-4 cm).
I'm not sure if the glue does its job well, the mixture is very grainy and if one of those grains comes off during polishing, I despise all the work done so far, I'm not sure I can stick the pitch squares on it.
I update you anyway.
It had been recommended to me by Giulio many posts ago even though he had anticipated that he had never tried anything like this, so it remained an attempt to alternate with dental plaster.
Meanwhile, I found it on Amazon this dental plaster, e this,they should be fine given the declared resistance (800 Kg / cmq), for the temperature it reaches during drying it should remain around 30 °.
The detail of the blade of light had escaped me, I have to double check it, I thought it was not important.
The thing changes instead if you see them rotate, or change inclination from intra to extra.
in the sense that I have to go back to grinding?

See you soon
 24 April 2020 at 14:23 #11740
Look when I made my record with dental plaster I had thought the same thing: “if a speck comes off, the whole mirror streaks me”, so I completely coated it with epoxy resin. Maybe it is also okay to completely cover it with vinavil, or in short, something that makes an adherent film that prevents any grain from peeling off.
Oh yeah, if the lines rotate from intra to extra it is probably astigmatism and you would be forced to return at least to the grain 600. But be careful because it could be fictitious astigmatism introduced by an excessive separation between the source and the returning light beam. Keep this distance as limited as possible max 15 / 20mm. If despite the precautions the lines still rotate, then it will be necessary to consider returning to the trouble.
But let's proceed step by step:
1) remake the most rigid tool and then you will evaluate / evaluate how it works.
2) run some new ronchi tests with the set-up nice aligned.
Hello and see you soon
Mirco25 April 2020 at 16:08 #11743So the outcome of the tile glue did not go very well, I would say really bad!
Later, after 48 hours of drying is still very fragile, so much so that it is possible to create grooves with the nail, perhaps the ideal would be to dry it
As for dental plaster, you have a few brands to recommend to play it safe?
These can be fine?

ADVANTAGES OF SYNTHETIC PLASTER
Very high hardness and resistance of the products
Very low expansion
Free from linear shrinkage
Biological safety due to the natural derivation of the various components
Biodegradability of the obtained artifacts
Adaptability to industrial or infant processing
Molecular structure of the finished product similar to red brick
No need for drying or cooking
Low thermal reaction peak around 30 ° C
Very high reproduction accuracy
Possibility of mass or surface colors
Physiologically non-toxic
Possibility of polishing the finished product with the brushes
Possibility of galvanic bath finishes
Utensils washable with waterCHARACTERISTICS OF SYNTHETIC PLASTER
Appearance: brick red powder
Mixing ratio: 1kg.(plaster):280 ml. (water)
Processing time: 10-12 me. c.a.
Solidification point: 15-20 me. c.a.
Time of demoulding: 30 me. c.a.
Brinell hardness: >300 N/mm²thank you.
See you soon

-
AuthorPosts
- You must be logged in to reply to this topic.