- This topic has 178 replies, 6 voices, and was last updated 4 years, 6 months ago by
Giulio TiberinI .
-
AuthorPosts
-
27 April 2020 at 0:23 #11744
hi Luca,
The plaster I used had kindly given me as a gift, my dentist's lab technician, and I can't tell you what brand it was.
However, in the village near mine there is a dealer of ceramic plaster, which also sells plaster for dental technicians. The type they sell to them is the: PRESTIA DUR n ° 1 of the Siniat, a lot from 25 Kg costs more or less 10-15 €, as an order of magnitude.
I have already recommended it to other friends as well, who then told me they found themselves very well. So if I have to recommend one, I'd tell you that. Then I think other types may be fine too.
Hello and see you soon
Mirco27 April 2020 at 19:19 #11745The plaster I used had kindly given me as a gift, my dentist's lab technician, and I can't tell you what brand it was.
Unfortunately, I had already placed the order when you answered me, so if what I got does not go well, I will use yours.

So I tried to redo the Ronchi to rule out the doubt that there was astigmatism.

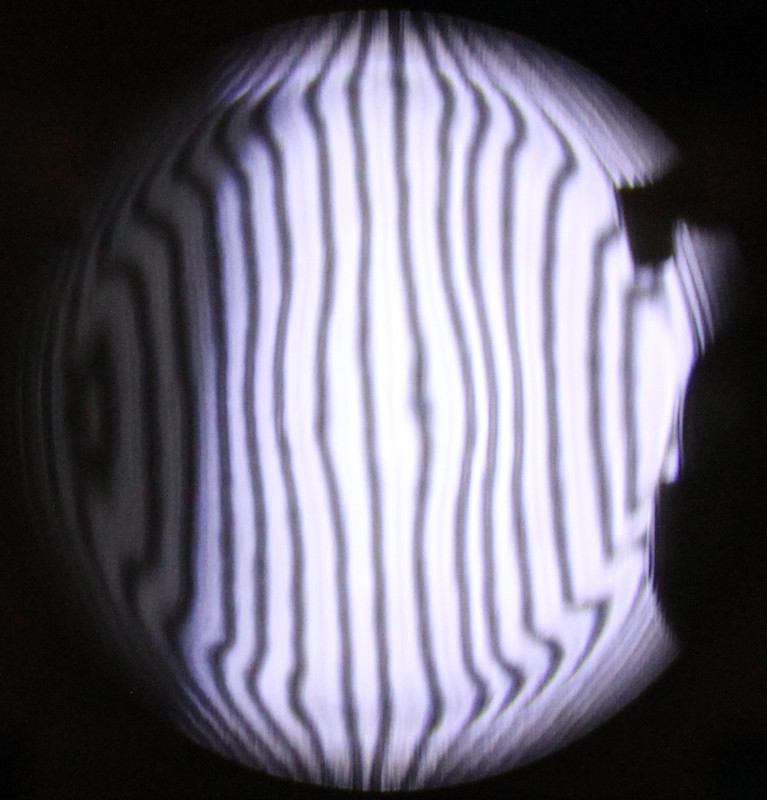
However, a minimum of displacement in the light beam is enough to end up with a completely out of test image, in the future I will do something more precise.
I had also tried the test using a laser… I couldn't .
.
I must also say that the tests presented previously were not so reliable since I took the image projected on the wall at a distance of 1-1,5 meters from the reticle.
As soon as I have the plaster available(prox. week) I proceed to redo the tool so we can see if the adaptation remains stable, and I try some polishing sessions as Massimo advised me to erase the defects found.As soon as possible.

Thank you
Luca
28 April 2020 at 14:22 #11746hi Luca,
:”I must also say that the tests presented previously were not so reliable since I took the image projected on the wall at a distance of 1-1,5 meters from the reticle.” aaaaaa here now I understand why the test images were strangely oval
From the last image, the edge seems much more riveted than it seemed in the previous images. What kind of rides are you using? Use an overflow of 1/6 of the diameter part by part or use an overflow of 1/3 of the diameter part by part? I ask you because it seems you are using too long strokes.
The advice is always valid to proceed first with the new realization of the support and see how it works, then we will make some other considerations.
hi Luca
good job 28 April 2020 at 23:32 #11747
Use an overflow of 1/6 of the diameter part by part or use an overflow of 1/3 of the diameter part by part?
So I used the classic race 1/3 of diameter COC.
But consider that the tool is not a full diameter, is approx 35/36 cm in diameter compared to the glass it is 41 cm, I don't know if the same rule applies in this case.
At the limit, as soon as I get back to work I try to run races that only touch the edge of the mirror without coming out of those 3/4 cm
Thank you
 29 April 2020 at 0:20 #11748
In my opinion, the problems you encounter are largely related to the use of non-uniform temperature in processing:
Other things to remember are the adaptation of the tool may well be done even when it is lukewarm to speed up the acquisition of the mirror shape a little, but then during processing it will only be the friction that uniforms the temperature of everything you use.
It is also always necessary to cut off the protrusions of the pitch from the tool disc. Certain non-tool and mirror scratches come from their uncontrolled crumbs.
Then you must not weigh with your hands on the tool otherwise the crushing produces a premature occlusion of the canals, and also protrusion of squares beyond the tool circumference.
a tool must last until the end of the parabolization, because doing it again changes the way you work, when the final tolerances have become a few millionths of mmA pitch that can be judged empirically right, releases the conifer scent after about half an hour of work, and requires reopening the grooves with the tip of a soldering iron, only after several hours of work.
On hot water for polishing, it should be borne in mind that its localized use raises the glass molecules. And that's what makes the tool smooth without friction, since it would only rest on a fraction of the surface (John Dobson also points out in his video).
Hot water can therefore be a useful expedient to abrade more in the "heated" area, but in the long run it is dangerous because it artificially changes the shape of the mirror with different temperatures, although obviously very little due to the poor removal that the oxide used produces, but the tolerances are of the same order of magnitude.
When polishing by hand, it is recommended to use cerium oxide, not to add the powder because it infuses an absolutely irregular amount, changing the contact surface and ruining the fit in one fell swoop.
Is’ better brush it in a creamy state, occasionally on the tool or mirror, diluted in a container with the ratio of one level spoonful of oxide, with two or at most three tablespoons of water.
In theory it would be almost useless to add cerium oxide during processing, because what works is only what is encrusted on the surface of the pitch squares. The rest is lost by leaching without working.Long "pulling" a nuisance trusting in normal friction, you get to have a lot of resistance to movement, conifer scent and whistles, which indicate that the time has come to avoid inducing inadvertent pressure on the tool. The discs are then separated, the surfaces are cleaned with a sponge, the oxide is brushed, and we start again with a new annoyance.
This is what I remember being the most decisive in the progress of the polishing work.
As for the plaster for the tool, the friend Andrea registered here “Beta Capricorn”, who has a lot of experience on the subject, he suggested me in this same Forum (but I couldn't find the discussion, because I don't know how to search) not to use very hard plasters to be cast directly on the mirror, because they reach a hardening temperature proportionally high to the final hardness, which therefore exceeds by a few dozen 100 degrees, with the risk of breaking the mirror.
However, there is a type of gypsum suitable for a certain specific dental application (…which is in that discussion that I would like to find again) which is much harder than normal plaster, but has a hardening temperature lower than i 100 degrees.
(IF you could find that post, thank you if you suggest it to me)
 Giulio29 April 2020 at 17:04 #11751
hello Giulio,
All these details are very interesting, these are variables that I will certainly experience as soon as I have a well-adapted and stable tool available.
By the way, do you think we can recover the dowels of the previous tool which, among other things, are also partially adapted?
I don't know if it's feasible, maybe trying to detach them in some way.
Otherwise I'll have to redo everything
The plaster that I have now ordered is defined as extra-hard .... it will certainly reach high temperatures, I tried to ask the dealer but he couldn't tell me exactly what temperature it reaches when drying, so in order not to risk breaking the glass I will use a cast of the curve of the glass made in concrete that I had aside.

See you soon

thanks a lot
 29 April 2020 at 17:55 #11752
hi Luca,
Ah ok now you can more easily explain that weird flaw to 3/4 ray. The’ tool must be full diameter, not so smaller than the mirror.
You absolutely must also make the tool of 41 cm, otherwise the mirror surface is not machined uniformly!
Then You will have to work with racing 1/3 COC (or ran of 13.6 cm) equivalent to a part-by-part overdraft 6.8 cm.Yes, right, I agree with Giulio, be very careful about the temperature that the water-plaster mixture reaches, during the chemical reaction that leads to its hardening. Unfortunately the effect of a sudden rise in temperature, I experienced it during one of my creations, and it wasn't pleasant at all:

https://www.grattavetro.it/forums/topic/primario-420mm-foca/page/2/#post-9845
On that occasion I had put a sheet of aluminized film (that from food) on the mirror surface, but obviously the aluminum being a good conductor has effectively transferred the heat from the plaster to the mirror, breaking it.
To minimize the chances of breakage, put something in it that is not a good conductor, type of parchment paper, or better 4-5-6-8 states of parchment paper. Or it can be as good as you thought you would, making yourself a concrete cast and using that.
Ciao
See you soon
Mirco29 April 2020 at 18:13 #11754Unfortunately the effect of a sudden rise in temperature, I experienced it during one of my creations, and it wasn't pleasant at all
Bad adventure, I'm so sorry

If it happens to me, I'll kill myself
So I have to redo the tool in the pitch of 41 cm?

If I go ahead with a tool smaller than the diameter I don't solve?
I was convinced that a sub-diameter was enough for polishing
See you soon
 29 April 2020 at 18:59 #11756
You say:
“By the way, do you think we can recover the dowels of the previous tool which, among other things, are also partially adapted”?And, you can retrieve them by cutting them around with a hot knife, if you can detach the squares you can also glue them on the tool you will make, heating the back of each picture with a candle, and placing them on the tool with a slight flat pressure (with for example a cap) so as not to deform them, or deform them as little as possible. In that case, however, the adaptation would put them on a par.
Excellent passage of plaster on concrete (otherwise you should pour the plaster on a mirror heated in a bain marie in order to reduce the distance between the hardening temperature of the plaster, from that of the mirror, which is still a risk).
29 April 2020 at 22:44 #11757No no you absolutely must use a tool from 41 cm, especially in the polishing phase and until a good sphere is achieved.
Even the initial part of the parabolization I suggest you do it with the full diameter.
Sub diameters require considerable experience and practice, in order to manage them.
I don't remember anymore, what focal length has the mirror?
Ciao
Mirco30 April 2020 at 12:23 #11759Well then I understand that I have to grind the whole tool to the new dimensions.
This is not a problem since I still have to do the plaster casting.
As for the focal length, I had chosen an F3, saw the question asked I took a look at the radius of curvature, now I find myself a measure equivalent to 230 cm.
If I have done the math correctly, my radius of curvature should be 246 cm so I'm out of 16 cm, this can lead to problems at the end of the job? ((410 mm X 3) x 2)
Otherwise I had thought of adapting the new focal length to the whole initial project.
It is feasible?
Another doubt that I am pestered by is always that cabbage of astigmatism.
I would like to do another different test to avoid the doubts I have, alternative al Ronchi?
I apologize if I seem too talkative but given my poor experience in the field I would not want to go on with polishing and then find myself having such a problem at the end of the job.
Regards.

Luca
30 April 2020 at 23:50 #11760Luca, now the focal remains that, to change it you should go back to abrasives.
Nothing changes for the project you want to do, it will be enough to recalculate the optical and geometric parameters of the system.
For the work to be done, however, it changes ! An F3 is very difficult for anyone, an F2.8 is even more so !
You will see that as soon as the sphere is finished you can set aside the full diameter because you will no longer need it, unless you have to redo the sphere.
Ma… it didn't have to be an F4? I remember badly ? 2 May 2020 at 1:35 #11761
But ... it wasn't supposed to be an F4? I remember badly ?

From the beginning, the focal length chosen was an F3.
It is a more than difficult goal, it is well known,but now I'm in the dance I can not back down.

I have to finish this mirror!!
To return to the starting focal length I would have to correct approx 5 tenths of excavation.
If we consider the fact that the mirror may have astigmatism, I would still have to step back and go back to abrasives.
What do you do in these cases?
It is wiser to go back or continue hoping to finish the job?
Ciao
 11 May 2020 at 15:11 #11802
What do you do in these cases ? god…

You can also check astigmatism with Ronchi, rotating the mirror in multiple positions and seeing if the lines change orientation.
For the rest I don't know… as you say you are now in dance and it is better to continue dancing
Let's see if we can build a good sphere, in case you can change your strategy…9 July 2020 at 18:09 #11921Let's see if we can build a good sphere, in case you can change your strategy ...
For the (good) sphere to reach I really hope to find the right path!
In the meantime I have built myself a new Ronchi test that is much more precise, so I also made sure that the glass did not suffer from astigmatism.(Even turning the mirror by different degrees, the image remains the same).
Meanwhile, I update you on some work sessions carried out with the new plaster tool.
I state that I was not able to get a good fit right away, to get all the pieces to touch I also had to resort to micro adaptations, however in the end it seems to me to have gone.
Compared to the last Ronchi posted, there is clearly a general improvement in the figure, albeit slightly.
The mound that was previously noticed at the edges of the figure is now no longer there, instead the hole in the center remains.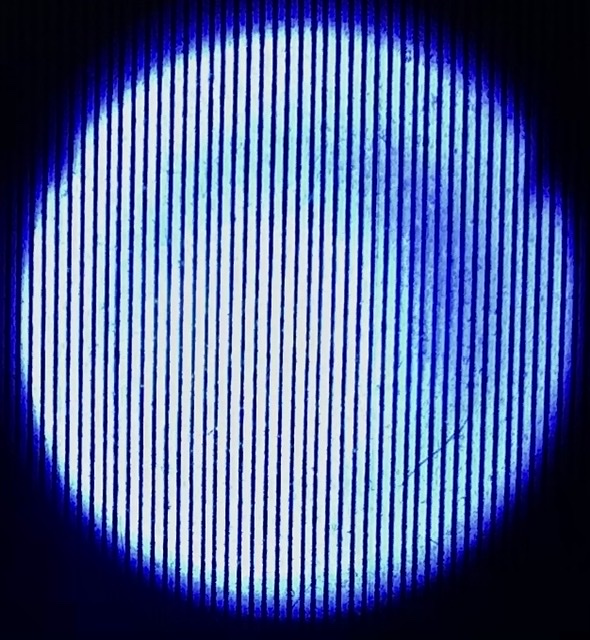
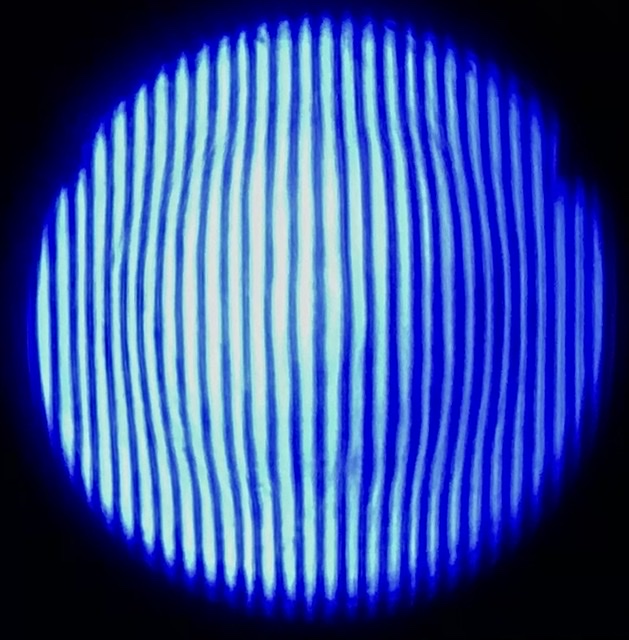
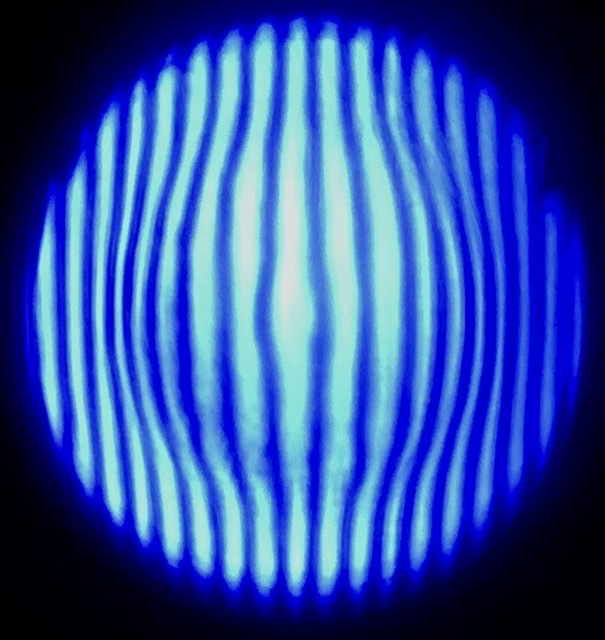
So I chose a fixed distance in the Ronchi test, I performed new polishing sessions always with the tool above( it is known that the tool above removes 70% in diameter from the edge without touching the center)I double checked with new Ronchi and nothing, the figure always looks the same to me, hole in the middle.
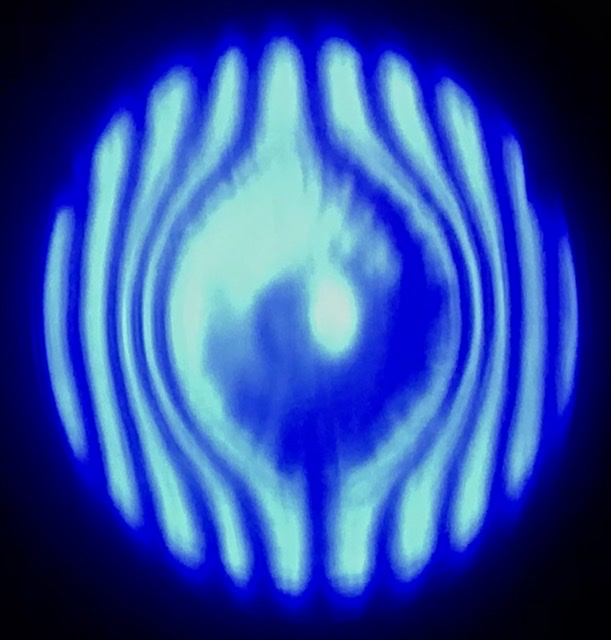
I also tried to turn everything by putting the mirror on it but already from the first sessions I saw that the central part got worse and was even more dug, so I put everything back as it was with the tool above.
At this point I feel a bit lost, i need some advice (probably also of Ariadne's thread), I don't know if it is appropriate to go ahead with the tool above hoping that something changes.
The paradox is that despite the insistence of machining with a tool above the figure, it does not move one iota, it is not strange?
At first I thought the hole was too deep to be reached with 2-3 hours of work and that they were not needed even more but by now I have reached the 16-17 hours should see some change instead nothing, instead the little hill that was on the edge disappeared in two sessions of 1 hour.Any advice is welcome.
Regards
Luca
-
AuthorPosts
- You must be logged in to reply to this topic.